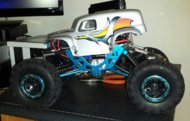
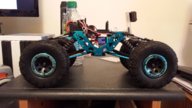
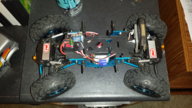
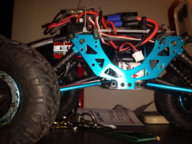
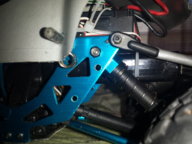
13 Days (and counting) with the ECX Temper. Now with video!

Haven't left home yet to try and grab some spare links. I keep banging my head about these tires! If I am going to buys a new set, I want a nice decent high mass set of rims and some good good tires. But I can't see myself putting the cost of the truck into a set of wheels. So to give these tires one last chance, I finally tried them without the inserts. Only messed around with it at home and the office so far and it's definitely gained some traction. It's a pretty big difference imo because of the increased "turn twist", not torque because this is the twist that happens when making a hard right turn on a high traction surface like no pile carpet and as I mentioned early on that it's just the rear axle wanting to continue on its original path due to a locked diff. Tightening up the left rear spring helped that initially but the extra traction won this time. It sounds bad, but the office is not it's intended playground.

I may just color match the wheels instead to freshen it up a little. I think for this footprint and weight, these tires are probably just fine without the inserts. I think the sidewalls are close to the right stiffness for this truck. At rest it seems the contact patch is about 1.5". I think with the insert it was maybe 3/4 to 1". Approach feels nice. Sinks in enough but no crazy sidewall folding. Looks legit so I will let it go and see what happens. The inserts might be necessary on a heavier 1/10 scale, but a little 1/18? Even after trimming them, I say just take them out.

I gotta slow down a little with the holidays coming. Son is asking Santa for the Polar Express train set and I think I'm getting dad the gmade jeep crawler. He liked the realistic c-channel chassis and u-bolts on the axles and leaf springs. The price seems good. If anyone has any alternate suggestions to this truck, please let me know! It's only about $250 ATR. Throw a DX2E in to get it moving. At least it has drag brake.
 
Last edited:
The only thing I can think of to make the tires more "grippy" would be to selectively shave or sipe some lug on the tread. My brother did the same as you on his 1/10 crawler (Redcat Everest - looks to be the same manufacturer as ours). Loves the no-foam stockers, but has also bought some G-Made tires to put on the stock rims, also with no foams. He's loving those too, and they seem to be a little more grippy... He's considering siping some lugs just for the extra edges to grab the terrain.
 
Oh yeah, forgot about siping. I might try that if needed.

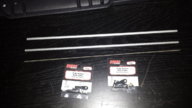
Made it to the lhs and no luck on the lower links. But I did find enough hardware to make my own. I grabbed enough for two links and an extra tube just in case I goof. If it works, I'll go back tomorrow before work to get the rest.
20151028_141505.jpg 20151028_142650-1.jpg
2-56 all thread
2-56 swivel ball links with hardware
3/16" aluminum tubing.
 
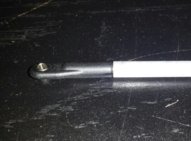
Okay here it goes.

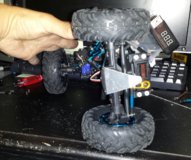
After a couple of hours mocking up with some heavy stainless wire, I finally decided on a way to do the upper links. In a joint effort with @Juanmarteen and his lower link mod, along with a stiffer and stronger suspension, we got full 180 degree articulation per axle. I'm not quite done yet but I wanted to post up the progress since all I have left is to make two more links, cut one more more link tube for the rear as well and drill a couple holes and mount and I will be done. I'm truly amazed and impressed with how it's coming out. It feels so much stronger.
20151028_191635.jpg 20151028_191817-1.jpg 20151028_192653-1.jpg
It goes completely vertical, just can't do it while trying to hole the camera and keep in mind that only the rear has been modded so far. Also, I still need to cut the ball end screws on the tranny mount for the lowers. Put some 263(red) loctite so they don't rip out.
 
Last edited:
Here's what I learned trying to do this 4 link. Moving the lower links to the center shortens the wheel base by a few mm. I haven't measured how much, but it's enough to make the spring rate too high now. But that's okay. I always felt that it was just too darn tall anyway. Well if I lower it just a little, it pushes the wheelbase back closer to stock. So rather play with the links anymore, I'm going to drill a couple of holes on all four top corners of the chassis plates (think shock towers with multiple heights/angles. This will allow me to adjust spring rate and ride height by changing the leverage point. In the example below, I moved the stock lower link balls to the inside and the weight collapses the shocks almost all the way. Shocks at stock position is too stuff and suspension never gets a chance to work, just stays stiff. This link method should work fine because it does flex freely without the shocks. Hoping I can find the sweet spot and get that center of gravity down.

@Juanmarteen , what do you think about the caster change when you moved your lower links? I tried to preserve the angle so made my uppers accordingly. Are you experiencing any u joint binding? The pinion angle has flattened out and increased the drive shaft angle enough where I am experiencing a little binding there.20151029_112552-1.jpg
So the more I look at it, it's very much like a double wishbone suspension. Just turn it sideways and imagine mounting a wheel if the servo had an axle. Just a matter of finding the right anchor point for these particular springs. Sure I could buy different springs to try but I'd rather change the shock angle to make it 'my own';)
 
Last edited:
Playing with upper shock mount locations. First attempt has a nice soft feel and doesn't seem to torque twist. So I like the rate, just not the height. More hard adjusting to do but I think I'm almost there. So far only dI'd it once today but I have to tear this thing almost all the way down to pull the chassis plates off so I can put them on the drill press.
 
After about 20 hours over the last three day, I finally got this suspension done. It took some trial and error but I think I got it all dialed in.

Some extra things I ended up having to do is cut my drive lines down due to the shortened wheelbase. Move my shocks in to lower spring weight. In the meanwhile, I also lowered the ride height a little since it seemed just too tall now with the shorter WB. Haven't made it to the rocks yet but talk about a huge improvement in handeling. No more torque twist, even on high traction surface on a hard right, the wheel may only raise about a quarter of an inch. Nice articulation over shoes and other household obstacles. Some obvious perks to this mod are better tire clearance on the lower links. Would get tire rub on the inside rear from power flex on the steering knuckle, no more suspension link/shock/axle collisions. Now instead of a drive shaft and lower link or lower link and shock hitting each other when articulating, your shock is the bottom stop where i think the drive line and lower link normally is. No more torque twist. No more rear upper link failure from the ball-stud ripping out of the joint under power. Lower center of gravity, and much improved flat ground handles. No more slop!

I'm starting to feel like I'm done with it. Not going to invest anymore money into it. I may just use it to experiment with links since I still have plenty of material to make my own links. It's a good puzzle. Had me banging my head a few times. =P
20151030_103315.jpg 20151030_103411.jpg
 
I honestly didn't pay much attention to caster, but I can see my tires lay over just a tad more in turns. My U-joints haven't been binding (yet?), and I'm real close to needing to shorten the shafts at the slide joint. Could you adjust pinion angle by lengthening the top susp. rods? I have noticed that the shocks seem a bit stiffer - I've been entertaining the idea of different springs, but it would fit my budget better to change position as you have.

Are the last two pics final ride height? Are you adjusting ride height with the shock locations (as well as spring feel)? The results sound killer (all the stuff I've been trying to minimize or eliminate) - hoping I have some time this weekend to work on it... I think I'm still going to go for the double-V setup on mine (at least for now), results will follow.

So, I wanted to do the total triangulation as you are trying to achieve but just couldn't find any decent point for the uppers on the axle. Because of the Y link failing on us, I wanted to eliminate it asap. Luckily I still have more link material so I will eventually tuck the uppers down below the servo level again after discovering what those unused holes are on top of the axle are for. Axial has a lower link truss that bolts up to those holes. So we either have to find one ore make them now. I think I'm gonna try to braze something together.

In the meanwhile, our Temper Tantrum handles like a dream. I think I found the sweetspot for the spring rate. That is a new shock location on the frame. That hole is the top outterm most unused hole and I just drilled it out to fit the ball studs. Had to put a washer on the shock side because the body hex is too big and doesn't allow it to mount the ball. Compressing all four shocks is so much softer and smoother, yet the suspension is stiff enough to have eliminated torque twist, and it's ready to articulate on demand. Huge huge improvment. Asiatees has a big sale going on. Lots of high mass wheels for only $20 a pair regular like $40-60. Real nice ones too, not junk. Just might have too...

Oh and @Juanmarteen adjusting length or position on the uppers will roll the axle for caster. And those last pics are of the final ride height. Gotta find a ruler and see where it's at now.
 
Last edited:
This is what we need @Juanmarteen I need to hit a lhs so I can try and measure that distance and see if it just happens to match. I highly doubt it but I'm willing to seek. Or Maybe I'll chime in at the Axial forums and ask someone to measure first.
2_2.jpg
 
For my one month recap, I have just did something stupid. Stupid because it took me this long to see it.

Everything I've done so far:
Tossed the tire inserts
Gambled on a 2s and it worked.
New body
4 wheel steering
Metal servo horns
4 link suspension upgrade with home made upper links
Lower link triangulation (thanks @Juanmarteen for the idea)
Home made axle skidplate/bumpers and tranny skid
Shortened wheelbase from 222mm to 218mm and slightly lowered ride height by a couple of mm as a result of link mod.

And finally, because of my suspension upgrade I had to relocated my shocks to adjust rate from all the changes it made, it gave me room below the battery tray to fit the smaller sized lipo pack! Not only does the pack sit lower, it sits well beyond the trucks centerline and just behind the front servo with no impacting during suspension articulation.
IMG_20151110_032402.jpg IMG_20151110_025531.jpg
IMG_20151110_033623.jpg

I wonder what the police would think if they saw me on the side of the road playing with my crawler on a rock mound at 3:30 in the morning because I dont think i can wait to see how it works. That would probably explain the 5150 in my name...
 
Last edited:
I wonder what the police would think if they saw me on the side of the road playing with my crawler on a rock mound at 3:30 in the morning because I dont think i can wait to see how it works. That would probably explain the 5150 in my name...

It's all I can do to not take mine everywhere - there are rock retaining walls everywhere around here...

Just to clarify, you lowered your ride height by moving the shocks inward towards the center of the rig?
 
Just to clarify, you lowered your ride height by moving the shocks inward towards the center of the rig?
Yes. Looking from the side, I used the chassis hole located same elevation as top shock mount, but inward a few mm's. It appears to lowered the shock angle ehh, about 5 degrees. Softened it up nicely too without contributing to torque twist but I think the 4 link was probably the cure. There is very little resistance when twisting the whole rig by hand. I feel like i got lucky and found a sweet spot in only a couple of tries. You would think the body would want to roll much in a turn but surprisingly it stays upright without slouching to either side.

I do want to start experimenting with other links. Axial links are very sexy. I'd settle for some plastics and paint them silver. I think in want to phase out the blue...
IMG_20151110_114128.jpg
 
Last edited:
Does your lipo monitor plug into the balancer port on the lipo pack? Is it adjustable for different voltages? Does is have an audio alarm? Where did you get it?
 
Does your lipo monitor plug into the balancer port on the lipo pack? Is it adjustable for different voltages? Does is have an audio alarm? Where did you get it?
I picked it up at my LHS for $9. There isn't an alarm on it which is why I posted it in the back window. They have several on Amazon that have alarms for about $5. I would prefer the alarm but I like to to shop local as much as I can and this is all he had. It plugs into the balance port and accepts up to 6s. No need to adjust anything. Depending on your cell count, it determines the voltage readout depending on how many taps are being used on the tester. Typically, they read out a total voltage, and a voltage for each individual cell.
 
Last edited:
I decided that I was just going to make my own because the axial mounts are 90 degrees out. But in the meanwhile I'm keeping an eye out for a 4pt that might use this axle. I mean, why are the holes there in the first place? Poosibly a stabilizer. But after seeing that axial pic...
 
NEW VIDEO!

(@Tyork_tex )


On a serious serious note, this place would be perfect for a good sized RC Crawler meet. Actually, could have a complete RC meet here. There's gotta be at least 5, maybe 10 unoccupied aircraft hangars here, some bbq's and picnic facility, skate park, soft ball and soccer fields, the ferry to SF is barely a few minutes walk, shopping nearby. I really wish I was in the position to open up an RC Superstore with a track or area for every flavor. One hanger could easily house the worlds largest indoor/outdoor rc shop tracks, pools, air courses and all, right smack dab middle of the San Francisco Bay Area, on an island no less. The Alameda Naval Air Station occupies about 1/3 the area of The City Of Alameda.

I love to share this stuff because it is one heck of a place to explore. Since it was an active military base up until the early 90's its always been off limits to the public, even for several years after closing to clean up hazardous waste and prepare it for turnover back to the city. It's since been reused and is home to business like wineries and distilleries, cinematography and special effect companies, bike shop, a huge gym with indoor and outdoor roller rinks, soccer fields, rock climbing, etc., BMW, Mercedes and Porsche set up autocross tracks for track day on their new and top models, a haunted aircraft carrier museum, monthly super sized antique swap meet that will take you about 4 or 5 hours to walk, and i'm sure there is much more that I haven't discovered yet.

Anyway, I just wanted to post something to show off a little of our Temper Tantrum's performance. We just sat at the first spot off the path where we parked. Like I said, this wall is about a half mile long, if not longer. The further you go out, the larger scale your gonna need. I can see a 1/8 scale being tons a fun trying to cross gaps to get to the end. Bring a rock racer and you might not ever leave. But this video is just a teaser. It does not reflect the endless possibilities for gates. I wanted to go back today and shoot a ton of video but were feeling pretty sick and yesterday's outing didn't do our colds any justice.
 
Last edited:
Unfortunately, the only angle I could get a decent spot to prop my cell phone in the dirt makes this nice little gate look totally harmless. I'll try to remember to get a pic next time I go, but if I roll it on that last step up, it easily roll into the drink. the middle step is a flat asphalt chunk laying about 45 degrees down towards the salt water. I didn't care, that was just too much fun.

I'm buying an action cam like now...
 

Latest posts

Members online

No members online now.
Back
Top